Cloudflare Logpush
Cloudflare Logpush 会自动将 HTTP 请求日志发送到 Ahrefs。对于高流量网站,这是推荐的方法,但需要 Cloudflare 企业版套餐。
前提条件
- 您要监控的 zone 已开通 Cloudflare 企业版套餐。
- 一个具有以下权限的 Cloudflare API 令牌:
- 区域 → 区域 → 读取
- Zone → Logs → Edit
- 仅适用于手动设置:在本地安装
jq,设置命令会使用它来读取并更新你的 Cloudflare 配置。
获取 Cloudflare API 令牌
请确保您已使用正确的账户登录 Cloudflare Dashboard。然后前往 https://dash.cloudflare.com/profile/api-tokens 页面,找到并点击右上角的 Create Token 按钮:

现在继续进行 创建自定义令牌 流程:
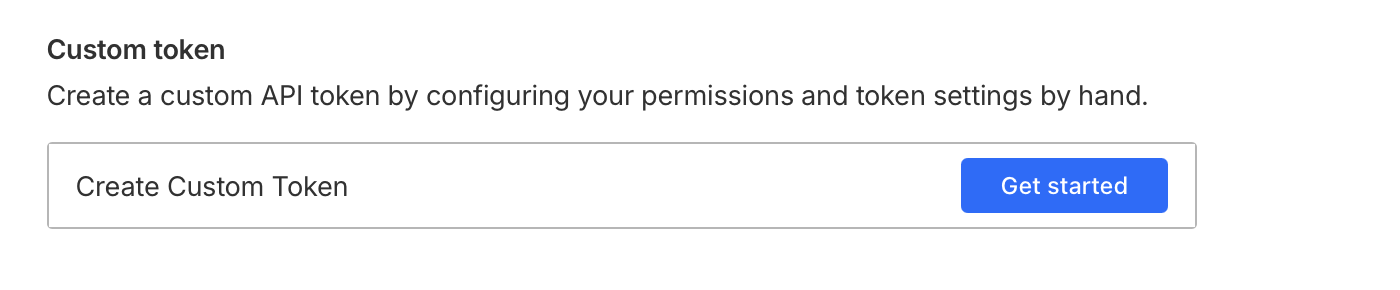
填写以下信息:
- API 令牌名称:ahrefs-bot-analytics
- 授予以下权限:
- 区域 / 日志 / 编辑,以便我们配置 Logpush 作业,将日志推送至 Ahrefs Bot Analytics
- 区域 / 区域 / 读取,以便我们找到要配置的区域
- 区域资源可以设置为 包含 / 所有区域;或者选择与你的网站域名对应的区域。
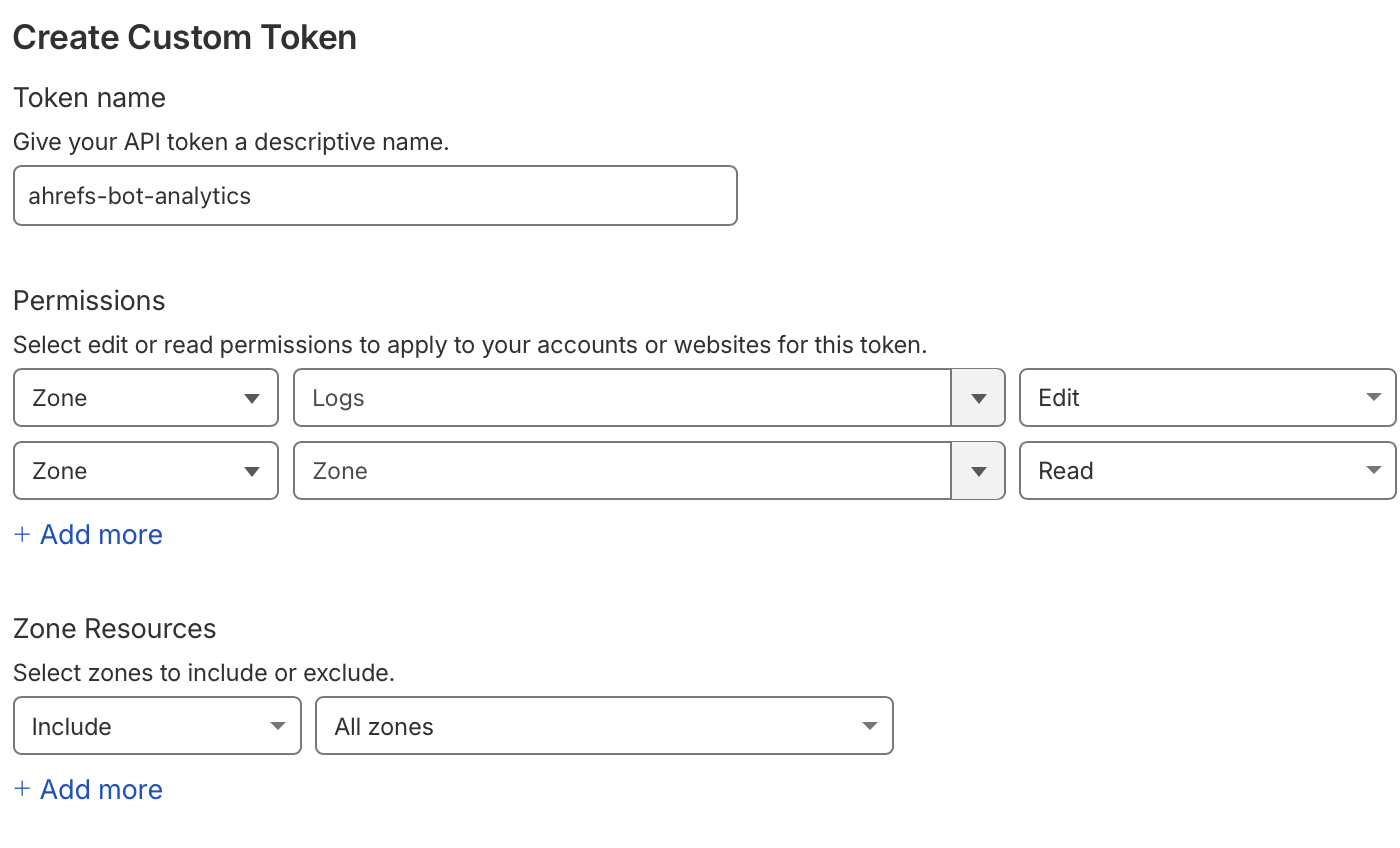
现在点击 继续到摘要 按钮,摘要应如下所示:
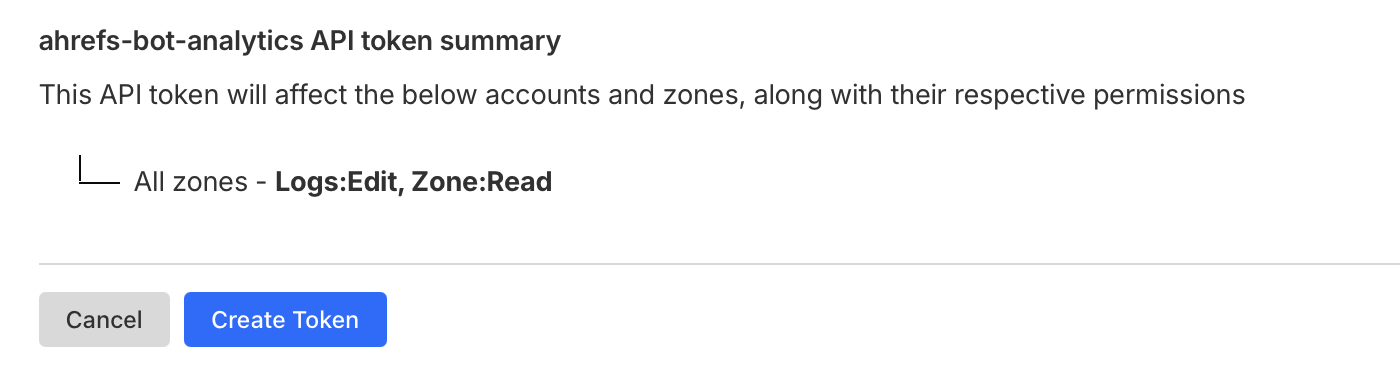
现在点击 创建令牌 按钮,并将生成的令牌复制到剪贴板,以便在接下来的步骤中使用。
更多信息请参阅 Cloudflare 文档:如何创建 API 令牌。
自动设置
- 在 Ahrefs 中,前往项目设置 → Bot Analytics。
- 选择 Cloudflare Logpush 作为方法。
- 粘贴您的 Cloudflare API 令牌,然后点击 连接。
Ahrefs 将使用您的令牌来:
- 查找与您项目域名匹配的 zone。
- 检查是否存在现有的 Logpush 任务.
- 创建新任务,将日志发送至 Ahrefs。
- 为该区域添加一条自定义日志字段规则,使日志中包含机器人验证标头(
signature、signature-input和signature-agent)。你在该区域上已有的规则将被保留。
info
您的令牌仅使用一次,不会被存储。
手动设置
如果您不想提供 API 令牌,也可以使用 Cloudflare API 手动设置 Logpush 任务。
第 1 步 — 获取你的 API 令牌
-
前往您的 Cloudflare Dashboard,并选择您网站的域名。
-
点击“获取您的 API 令牌”,并使用以下权限创建一个新令牌:
- 区域 → 区域 → 读取
- Zone → Logs → Edit
详细说明请参阅获取 API 令牌。
info
你无需查找自己的区域 ID。这些命令会使用 区域 → 区域 → 读取 权限,通过你的域名找到对应的区域。
第 2 步 — 创建 Logpush 任务
在第一个代码块中填入你的 API 令牌,然后在终端中依次运行下面的每个代码块,并检查每个代码块是否都能在无错误的情况下完成。它们会共同完成以下操作:找到你的区域、创建 Logpush 任务,并添加 自动设置 中描述的自定义日志字段规则。您可以在 项目设置 → Bot Analytics → 手动设置 中找到已按您项目详情预填的准确命令。
export CF_TOKEN="<your Cloudflare API token>"
BASE="https://api.cloudflare.com/client/v4"
Find the Cloudflare zone for yourwebsite.com
ZONE_ID=$(curl -s --fail-with-body "$BASE/zones?name=yourwebsite.com&status=active&match=all" \
  -H "Authorization: Bearer $CF_TOKEN" | jq -r '.result[0].id // error("no active Cloudflare zone found for yourwebsite.com")')

echo "ZONE_ID=$ZONE_ID"
Remove the existing Logpush job if present
OLD_JOB_ID=$(curl -s --fail-with-body "$BASE/zones/$ZONE_ID/logpush/jobs" \
  -H "Authorization: Bearer $CF_TOKEN" | jq -r '([(.result // [])[] | select(.name == "ahrefs-web-analytics-http-requests")])[0].id // ""')

echo "OLD_JOB_ID=$OLD_JOB_ID"
if [ -n "$OLD_JOB_ID" ]; then
  curl -s --fail-with-body "$BASE/zones/$ZONE_ID/logpush/jobs/$OLD_JOB_ID" -X DELETE \
    -H "Authorization: Bearer $CF_TOKEN"
fi
Create the Logpush job
curl -s --fail-with-body "$BASE/zones/$ZONE_ID/logpush/jobs" -X POST \
  -H "Authorization: Bearer $CF_TOKEN" \
  -H "Content-Type: application/json" \
  --data-binary '{"name":"ahrefs-web-analytics-http-requests","destination_conf":"https://analytics.ahrefs.com/api/cf_logpush/http_requests?header_x-ahrefs-web-analytics-property=YOUR_PROPERTY_KEY","dataset":"http_requests","frequency":"high","filter":"{\"where\":{\"or\":[{\"key\":\"ClientRequestHost\",\"operator\":\"eq\",\"value\":\"yourwebsite.com\"},{\"key\":\"ClientRequestHost\",\"operator\":\"endsWith\",\"value\":\".yourwebsite.com\"}]}}","output_options":{"field_names":["ClientIP","ClientRequestMethod","ClientRequestHost","ClientRequestProtocol","ClientRequestScheme","ClientRequestURI","ClientRequestPath","ClientRequestUserAgent","ClientRequestReferer","EdgeStartTimestamp","EdgeEndTimestamp","EdgeResponseStatus","EdgeResponseBytes","EdgeResponseContentType","EdgeTimeToFirstByteMs","ClientCountry","ClientCity","ClientASN","ClientDeviceType","ClientRegionCode","BotScore","BotScoreSrc","BotTags","VerifiedBotCategory","RayID","RequestHeaders"],"timestamp_format":"unixnano"},"enabled":true}'
Add the custom log fields rule
RULES=$(curl -s --fail-with-body "$BASE/zones/$ZONE_ID/rulesets/phases/http_log_custom_fields/entrypoint" \
  -H "Authorization: Bearer $CF_TOKEN" | jq -c '.result.rules // []')

echo "RULES=$RULES"
BODY=$(jq -nc --argjson rules "$RULES" \
  '{rules: ([$rules[] | select(.description != "ahrefs-web-analytics-web-bot-auth-signature")] + [{"action":"log_custom_field","expression":"true","description":"ahrefs-web-analytics-web-bot-auth-signature","action_parameters":{"request_fields":[{"name":"signature"},{"name":"signature-input"},{"name":"signature-agent"}]}}])}')

curl -s --fail-with-body "$BASE/zones/$ZONE_ID/rulesets/phases/http_log_custom_fields/entrypoint" -X PUT \
  -H "Authorization: Bearer $CF_TOKEN" \
  -H "Content-Type: application/json" \
  --data-binary "$BODY"
info
仅在订阅了 Cloudflare Bot Management 后,才能使用 BotScore、BotScoreSrc 和 BotTags 字段。不过,即使没有这些字段,Bot Analytics 也能正常运行;但包含它们可以提升机器人分类的准确性。如果你的区域没有 Bot Management,请在创建任务之前从 field_names 中移除这三个字段。
warning
destination_conf URL 和属性键是您项目专属的。请从您的 项目设置 → Bot Analytics 页面复制准确的命令,以确保值正确。
第 3 步 — 验证连接
创建作业后,返回 Ahrefs 中的项目设置 → Bot Analytics,然后点击检查状态,验证数据是否正在被接收。